1: Get good photos
Whether identifying bugs for work or pleasure the first step is to get great images
When I set out with my battered old Canon 350D camera my main aim is always to take the most beautiful pictures of insects I can. I love those pin sharp to completely blurred images that a very short depth-of-field will give but obviously the resulting photos are not always that much use when it comes to identifying the subject. Therefore I always try (if the insect is being co-operative) to get a few id-friendly pics as well as the arty shot I’m after. If you’re an experienced photographer you’ll probably know most if the following but if not here’s a crash course in getting good macro shots…
Understand your camera settings
Most point and click cameras will have a macro setting, usually indicated by a little icon of a tulip, which allows you to take close-up pictures, so if you’re using a compact camera this will be the setting to choose. As I don’t use a compact I can’t really offer much advice (although the following information still generally applies) but you can find more info here if this is the kind of camera you’ll be using.
If you have a SLR camera then you’ll need to invest in a macro lens if you don’t have one. (All my shots are taken using a Canon 60mm. I’d like more choice but I can’t afford it!). I’m not going to go into detail here so it’s up to you to do the research and make a choice based on your camera body and budget. Basically with a 50mm you’ll need to get very close to your subject to get a 1x image and a 100mm will let you get the same magnification from a little further away, sometimes an advantage with particularly skittish insects.
With a SLR set-up you have more control over how your images appear and juggling the aperture and/or exposure setting will affect the overall result. Using a wide aperture (say f/2.8) will have a very shallow depth-of-field (ie the amount of the picture that is in focus) and get you those heavily blurred arty shots. A small aperture (say f/16) will mean much more of the insect is sharp but there is a pay-off in terms of exposure times. Generally a wide aperture will give you faster exposure times and a narrow aperture will give you slower ones – and balancing these to get the shot you want is something that comes with practice. It’s also worth noting that the closer you are to a subject the shallower the depth-of-field will be generally, so it sometimes pays to move a little further away to get more of the image in focus if that’s what you’re after. However, as you’ll often be working in extreme close-up the slightest movement can result in the whole image being out-of-focus so a fast exposure time will give you the best chance of capturing a sharp image. Ideally you’re looking for a minimum exposure time of 250th of a second although on a still day, with a motionless insect, you can get away with less.
It’s probably worth mentioning that many photographers use flash to improve the lighting situation, for example when taking photos in woods, but to be honest it’s an art unto itself which I’ve never really mastered. When used well the results can be stunning but used badly it’s horrid and as I fall into the ‘used badly’ category I tend to avoid it. I find that with a bit of planning I can get the results I want with natural light but if you need to know more about using flash I’m afraid you’ll have to search elsewhere.
Choose a good day to go out
It’s reasonable to assume that most bug photography takes place during spring, summer and autumn but with our variable weather picking a good day to go out with your camera seriously improves your chances of getting good shots. Ideally choose a bright day with little or no wind but if the weather is less than perfect your camera can help. Using the ISO setting (that is, film speed) you can take pretty good photos on slightly overcast days or those where the sun keeps popping behind clouds and back out again. However, there is a pay-off between film speed and quality – the higher the ISO setting the grainier your pics will be – but basically a slow setting of ISO 100 will give you pin-sharp images but slower exposure times and is best employed on very bright days while a faster setting of ISO 400 will lead to slightly reduced picture quality but with quicker exposure times – good for cloudier days. Generally I use ISO 200 even on sunny days as the increase in shutter speed means I have greater control over the end result and I’ll only go up to 400 if the weather conditions demand it. Although modern cameras can go much higher – mine goes up to ISO 1600 – my experience is the drop in picture quality is not worth the gain in exposure times.
One thing a camera can’t do is stop the wind blowing and as I’ve already mentioned even the slightest movement when taking macro photographs can ruin a shot. I’ve been known to come home with only one or two sharp photos out of a hundred odd just because a breeze kicked up, so if it’s too windy I wouldn’t even bother going out! Oh, and obviously steady hands combined with sure footing will always help.
Get those identification friendly shots
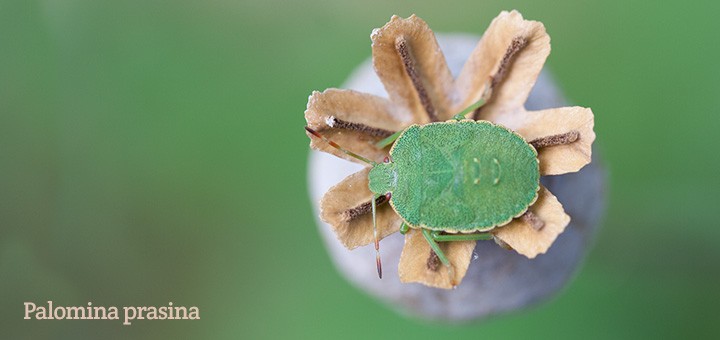
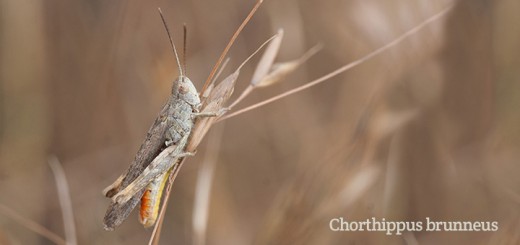
Armed with the right kit and an understanding of aperture/shutter speed/depth-of field it’s time to take pictures. My personal approach varies depending on the situation but usually I try to get the beautiful photo first and then a few shots to aid identification of the insect. I tend to set my camera to the Aperture Priority (AP) setting so I can switch quickly between wide aperture/arty shot and small aperture/detailed shot modes. Having (hopefully) got my lovely image I will then deliberately try and shoot – if the insect is obliging – the wings/top view, a side view and the face. This is not always possible but it will really help when you get your photos back home if you can. Obviously it depends on which bug you’re photographing but if you can only get one shot, try for the top view as in my experience this is usually the most useful.
If you are taking photos purely for recording purposes it will prove best to try to keep your aperture setting at a minimum of f/8.0, ideally higher, to get all of the insect in focus.
Conclusion
Obviously, having the right camera equipment and an understanding of how it works is key to getting good shots although a decent slice of luck always helps! Picking the best day to go out is also going to be advantageous. The other main ingredient in getting great photographs is finding those bugs in the first place and understanding their habits and behaviour which will be the subject of my next blog, ID TIPS 2: Bug hunting basics.
Further Information
If you want a more comprehensive guide to taking great close-ups, including how to use flash properly, you can’t beat Robert Thompson’s book Close-up & Macro: A Photographer’s Guide (D&C, IBSN 0 7153 1903 5). Packed full of great (if sometimes technical) advice and stunning photos it will be the only book you need on the subject.

Recent Comments